Mountain Men and Life in the Rocky
Subject Guide

Mountain West
Malachite’s Big Hole
Making a Wooden Shipping Case:
There are a number of reasons you may wish to have one or more period correct shipping cases. For one, it’s a great way to pack your equipment and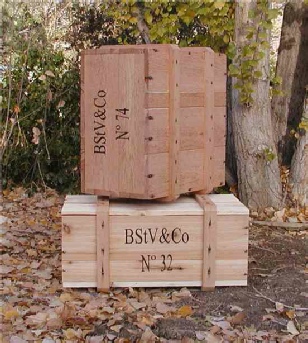 plunder to and from events. You need containers for these items anyway-why not have containers you can leave in plain sight around camp, rather than keep under wraps or schlep back to the vehicles. And having them will greatly add to the authenticity of your camp once you are set up. Finally the cases will present a handy seat (for those of us who are getting too stiff to enjoy sitting on the ground) that aren’t as jarringly out of place as those folding wooden chairs you often see at ronny-voos.
plunder to and from events. You need containers for these items anyway-why not have containers you can leave in plain sight around camp, rather than keep under wraps or schlep back to the vehicles. And having them will greatly add to the authenticity of your camp once you are set up. Finally the cases will present a handy seat (for those of us who are getting too stiff to enjoy sitting on the ground) that aren’t as jarringly out of place as those folding wooden chairs you often see at ronny-voos.
Dimensions of the Case: Ultimately this is something determined by your own needs. Cases would have come in many sizes and shapes, depending on what the contents were and who was constructing the case. An example would be a case for transporting rifles or guns. On the other hand, cases used for transporting small items, or mixed inventory, may well have had standard dimensions. Decide what you are going to be transporting in the case and use that to determine the dimensions of the case you will need. Weight should also be a consideration, as the 24”X24”X18” case (the red case) shown in the picture above weighs about 26 pounds empty-a large case containing heavy items may quickly become unmanageable. You will also need to decide if you will use cleats on your case. Cleats give added strength to the case, to protect fragile or valuable items, however, they are not necessary. Cleats are bands of wood, about two inches wide that ring the case.
Materials: Because the purpose of the case was to protect the contents from weather and pilfering only as far as the final destination (trading post, trading camp, fort or rendezvous), the wood used for constructing the case would have been cheap, strong, probably un-planed and rough-cut. And because most lumber of the times was cut in saw pits, the saw lines would have been straight transverse lines across the board. Now that said, obtaining such lumber today, at least in the big city is not so easy. I’ve used ¾ inch rough cedar deck or fence material which is planed on one side. It doesn’t have the transverse lines, but it doesn’t have the curved lines of a circular blade either. For other cases I’ve also utilized planed pine with knots.
In the early 1800’s screws were immensely expensive compared to nails and would not have been used for the construction of mere shipping cases. Nails were square, or cut. You wont have to get your favorite blacksmith hammer out a bunch of these for you, they can be purchased by the pound from Tremont Nail Company. For this project I used 2-inch hinge nails, which are clinchable.
Assembling the Case: Cut the lumber to the dimensions you require for your case. After the lumber is cut to size I use a rasp to ever so slightly round over the edges where boards will butte up against each other to increase the visibility of the joint. Because I want my cases to last for many events over many years, I used a mixture of period and contemporary construction techniques. I first assembled the case using dowels. Since the lid is to be removable, hopefully with relative ease, dowel were placed for the lid, however glued only on the case side. Thus the lid is held in place by friction, and can be removed by prying it up with a butcher knife or screwdriver.
After the case is pre-assembled using dowel, drill holes to accept the cut-steel nails. Cut-steel nails are more like pegs then pins, and will want to split most kiln dried lumber near the edges. Early 1800’s lumber was not kiln dried, and in most instances was probably green when used for cases, so the wood would have accepted cut-steel nails without splitting. Experiment on some scrap wood to determine what size hole is necessary to prevent splitting 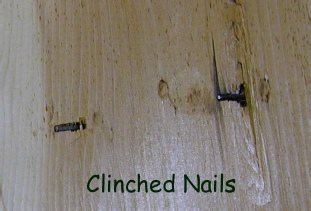 of the wood you are using. Depending on the width of the boards, I use one or two nails per board on each end. If you are using cleats, the nails will fully penetrate the wood, with about ½-inch extending into the inside of the case. You will need to clinch these on the inside (that is pound them over so they are flush). Nails can be used around the perimeter of the lid, but in order to remove the lid, they will need to be cut off so they don’t penetrate into the case. If you’ve constructed your case with cleats, remove the sharp corners by cutting them off at 45-degrees. Your case is now complete.
of the wood you are using. Depending on the width of the boards, I use one or two nails per board on each end. If you are using cleats, the nails will fully penetrate the wood, with about ½-inch extending into the inside of the case. You will need to clinch these on the inside (that is pound them over so they are flush). Nails can be used around the perimeter of the lid, but in order to remove the lid, they will need to be cut off so they don’t penetrate into the case. If you’ve constructed your case with cleats, remove the sharp corners by cutting them off at 45-degrees. Your case is now complete.
Weathering and Labeling: You may want to weather, and/or label the case. By exposing your case to rain, or a sprinkler, the nails will rust and dark stains will bleed off into the wood surrounding the nails. The case will not need extreme weathering. Remember that most of these cases generally had a useful life not exceeding several months. So other than experiencing hard use in transport, the exterior wooden surface would have had a relatively fresh surface.
How you choose to label your case(s) will depend on who and when you are, 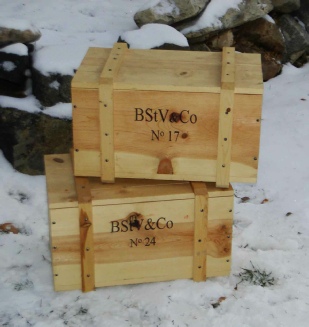 and what companies were active in the area in which you attend events. I chose to label these cases BStV&Co No 17 and 24. The Bent and St. Vrain Co. was active not only at Bent’s Fort on the Santa Fe trail, but operated stores in Mexican Taos and Santa Fe and sent traders with wagon loads of trade goods along the entire front range up to and even beyond Fort Laramie in southern Wyoming. Because I often do volunteer events at Bent’s Fort as well as along Colorado’s front range I have plausible reasons for having cases with this company’s label. Labeling was originally done by hand, so initials and abbreviations would have been used as much as possible. For some companies this is easy as in HBC or NWC for Hudson’s Bay Company and Northwest Company respectively. In the case of Bent, St.Vrain & Company the abbreviation is not so clear. I have seen documents in which the company name is abbreviated as I have done on these cases. However, other abbreviations were also in use at the time. Which abbreviations were used may have depended on the relative level of literacy of the clerk preparing the cases, and the time pressure he may have been under to complete the job. Also, if venders were preparing the cases, yet other abbreviation systems may have been devised. Cases containing only one product type may have been marked to indicate the contents, for example “Coffee” or “Lehman Rifles.” Also, any company shipping dozens or perhaps hundreds of cases would have numbered individual cases for inventory control reasons. The case markings originally would have been done using lamp black/linseed oil or some similar mixture. Again, because I seek long term permanence I’ve use black permanent marker. The ink will bleed out into the rough cut wood, so your lettering will be somewhat fuzzy. Don’t sweat it, this is a problem the old-timers would have had as well. Bleeding can be reduced somewhat by using a nearly spent marker. Because I can’t draw a straight line to save my soul, I used a computer to generate a lettering template for the labels used on these cases. The font used is Times-New Roman, which was elongated about 30% in the vertical direction.
and what companies were active in the area in which you attend events. I chose to label these cases BStV&Co No 17 and 24. The Bent and St. Vrain Co. was active not only at Bent’s Fort on the Santa Fe trail, but operated stores in Mexican Taos and Santa Fe and sent traders with wagon loads of trade goods along the entire front range up to and even beyond Fort Laramie in southern Wyoming. Because I often do volunteer events at Bent’s Fort as well as along Colorado’s front range I have plausible reasons for having cases with this company’s label. Labeling was originally done by hand, so initials and abbreviations would have been used as much as possible. For some companies this is easy as in HBC or NWC for Hudson’s Bay Company and Northwest Company respectively. In the case of Bent, St.Vrain & Company the abbreviation is not so clear. I have seen documents in which the company name is abbreviated as I have done on these cases. However, other abbreviations were also in use at the time. Which abbreviations were used may have depended on the relative level of literacy of the clerk preparing the cases, and the time pressure he may have been under to complete the job. Also, if venders were preparing the cases, yet other abbreviation systems may have been devised. Cases containing only one product type may have been marked to indicate the contents, for example “Coffee” or “Lehman Rifles.” Also, any company shipping dozens or perhaps hundreds of cases would have numbered individual cases for inventory control reasons. The case markings originally would have been done using lamp black/linseed oil or some similar mixture. Again, because I seek long term permanence I’ve use black permanent marker. The ink will bleed out into the rough cut wood, so your lettering will be somewhat fuzzy. Don’t sweat it, this is a problem the old-timers would have had as well. Bleeding can be reduced somewhat by using a nearly spent marker. Because I can’t draw a straight line to save my soul, I used a computer to generate a lettering template for the labels used on these cases. The font used is Times-New Roman, which was elongated about 30% in the vertical direction.
Finally, there is an excellent article about constructing period cases published in the January 2006 edition of Muzzle Blasts by Dennis Neely. This article is titled “David McCrea’s Case No. 47 .“ I broadly followed the methods and ideas suggested by Neely in construction of my first case.